In my previous post, Surviving A Kindle Fire Factory Reset – With (Most) Of Your Stuff Intact, I outlined a step-by-step process for backing up your Kindle Fire before performing a factory reset, then restoring that content after the reset. Now that the new Kindle Fire models are upon us, I’m getting this question pretty frequently: can the same method be used to transfer content from an old/pre-existing Kindle Fire to a new one?
The answer is: yes, but with some tweaks to the process. When I got new Fire I was able to test this out for myself, so I can confirm that it works.
A Step-By-Step Process For Relocating To A New Kindle Fire
The steps below, and screenshot, are from going through this process with a Kindle Fire HD model. The process is essentially the same for all Fire models, but folder names and locations on different generations of Fire tablets may differ slightly. In step 2 below, you may have to click around a bit for different Fire models to find the content folders, but the bottom line is that you’re finding the content folders and backing them up, then copying that content to your new Fire.
Note that there is no guarantee this process will preserve all of your progress in all of your apps, but it’s the only way to ensure the maximum that’s possible will survive. Some apps are designed in such a way that user data files are tied to a specific device and aren’t supposed to be copied anywhere else, but this is increasingly rare since consumers want to be able to access their stuff from multiple devices.
When I went through the process outlined below, in the end I found that every instance where I lost app progress was due to user error. Yes, even the DMM makes a user error now and then! I’d forgotten that anytime you delete app, music* or video content from your Fire, your bookmarks and progress are deleted, too. When you delete something (other than Kindle books and Audible audiobooks, which you can sync to Amazon’s Cloud to save your progress) from your Fire, Amazon’s system is set up to assume you’re done with it—at least, for the time being—and therefore you will no longer need the bookmarks or progress data.
*Exception for “My Music Library” – if you have a “My Music Library” set up in Amazon’s Cloud, and you typically stream your music from the Cloud instead of downloading it for offline listening, the Cloud will “remember” where you left off last time you were listening.

So when I opened up The Curse puzzle app and found myself right back at the start of the game, at first I thought my progress had failed to copy. Then I remembered that I’d deleted the app from my Fire months ago, and re-downloaded it later but had yet to re-open it since then.
But the point is, when you’re all done with this process, if you find you’ve lost some app progress it was probably due to either a previous deletion of the app or a failure to backup properly. That last one shouldn’t happen to you, if you follow the steps in this post.
1. First, delete as much as you can from your existing Fire. If you’re like me, you’ve got all kinds of apps you never use anymore, books you’re finished reading, and more stuff on your existing Fire that doesn’t really need to be copied to the new one. Delete as much of that stuff as possible, because it will make the rest of this process go MUCH faster and easier. Any content you delete from your Fire remains in the Cloud on Amazon’s servers, so you can always re-download it later if you change your mind. But don’t forget: DO NOT delete any apps or games where keeping your progress is important to you, because deleting the app/game from your Fire will also delete your progress.
To delete, tap and hold on the icon for the item to be deleted and select “Delete From Device” from the pop-up menu.
Note: not everything that appears in your carousel has actually been downloaded to your Fire, and the “Delete from Device” option only shows up for stuff that’s has actually been downloaded to your Fire. To save yourself the bother of tapping on everything you see to check for this, just go into the various content menus (e.g., Books, Videos, Apps, Games, etc.) and tap the “Device” link to limit your view to stuff that’s been downloaded.
 2. Manually sync your existing Fire to the Cloud. Amazon’s digital ‘ecosystem’ is set up such that ‘where you left off’ bookmarks and custom bookmarks you’ve created in Kindle books and audiobooks are stored in the Cloud automatically—but only when there’s an active Wi-Fi or cell connection. This is also true of some Amazon apps—apps that are created and maintained by Amazon, like the Audible app and the Kindle Reader app, so we’re not talking game apps. To be sure all your markers will be stored to the Cloud (and therefore, will be in place on the new Fire), turn on your Wi-Fi or cell connection and manually sync to the Cloud.
To manually sync most of your bookmarks, swipe downward on the home/carousel screen to open the Settings menu and tap the Sync icon.
If you have any audiobooks with bookmarks and are copying content from a first or second-generation Fire, there’s an extra step. In my experience, on a first or second-generation Fire, Audible audiobook bookmarks will only reliably sync if you perform the sync from within the Audible menu. On your Fire, open the Audible app and sync using the app’s Sync icon. On Fires from 2013 or later, the app is integrated right into the operating system so there is no separate sync function just for audiobooks.
3. Connect your existing Fire to your computer via USB. In File Explorer, Finder, or whatever your computer uses for browsing files and devices on your computer, locate and open the Kindle Fire folder. In Windows 7, you can go to Computer > Kindle Fire. You should see a folder listing that looks something like this:
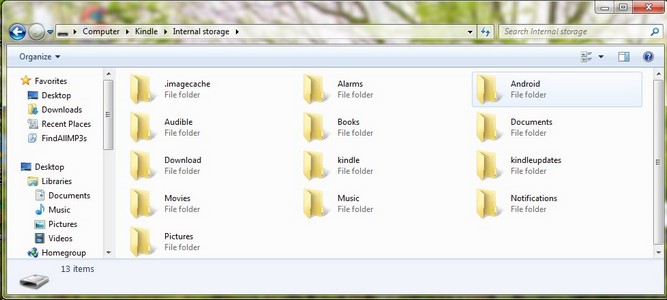 4. Backup your content and data. Create a folder somewhere on your computer’s hard drive called KFBackup or something similar to hold your backups. Now copy (do NOT cut and paste, COPY) the following folders (those that exist – you may not have all the same folders, depending on what content is on your Fire) to your backup folder: Alarms, Android, Audible, Books, Documents, Download, Movies, Music, Pictures.
 Do not copy the other folders, as they are system folders that may contain new files in the newer-model Fire.
Note that if there’s a type of content you know you don’t have on the Fire, you can skip that folder. For example, I know that I’ve never set alarms on my Fire so I don’t need to backup that folder because there’s no personal or custom data in it. Similarly, if you’ve never watched a movie on your Fire, you can skip the Movies folder.
5. Detach your old Fire from your computer. First, eject/detach your Fire from your computer. Depending on your computer / operating system type, you may have to right-click on the Fire’s icon in your Finder/File Manager and select ‘eject’ to safely remove it.
6. Register your new Fire. Make sure it’s fully charged, then start it up and follow the prompts to register your new Kindle Fire to your Amazon account.
7. Re-download key apps. Some apps, like many game apps from EA Games, rely on data stored on the developer’s servers to run, they aren’t actually fully installed on your Fire. While such apps may store small bits of data on your Fire, the majority of your game content and progress are stored online and ‘fed’ to your Fire when you start up the app. The app will need any of those data bits that ‘live’ on your Fire, but the app may have to be re-downloaded, too.
Some apps of this type are easy to spot because they require the user to be logged in to an online account in order to run properly, but you may have opted to let some connect automatically using your Facebook, Gmail or other accounts. Therefore, rather than try to remember or figure out which ones have to be re-downloaded, just play it safe by re-downloading ALL apps that are very important to you.
 To re-download, on your new Fire go to the Apps and/or Games page by tapping the appropriate menu link (game apps will be on the Games page). Tap the Cloud link to view all the apps stored to your Cloud. One by one, long-tap on the icon for each desired app or game and select ‘Download’ from the pop-up menu. While you aren’t strictly required to let one download finish before starting another, in my experience each new item you add to the download queue slows everything down so in the end, it’s faster to download them one by one.
8. Re-download desired Kindle books, audiobooks, music, etc. from the cloud. On each content page on your new Fire (e.g., Books, Audiobooks, Video, etc.), follow the same process detailed above to re-download your desired content from the Cloud. Your bookmarks will come too, since you manually synced from your old Fire in step 2.
9. Connect the new Fire to your computer to restore your backed-up files and data. This can be a tedious process if you’ve got a lot to copy, but try to stay focused as you do it. You don’t want to accidentally copy App files from your old Fire into the Video folder on the new one, so pay close attention to what you’re doing here.
With the new Fire connected to your computer, open one Finder/File Explorer window with the new Fire’s content listed in it, and another with your KFBackup (or whatever you named it) folder open in it. Size the two windows so you can have them open side-by side at the same time. For each folder you backed up, follow these steps to restore the backup to your Fire:
a. Open the desired content folder in the Fire window (e.g., Alarms, Books, Movies, etc.).
b. Open the corresponding folder in the backup folder window (e.g., if you opened ‘Alarms’ in the Fire window, open ‘Alarms’ in the backup window).
c. Copy all the contents from the backup window to the new Fire content window.
— ***IMPORTANT NOTE ***— DO NOT copy the Android > Data > Amazon folder from your backup. When copying everything from your backup after the reset, skip the Android > Data > Amazon folder. That folder contains the unique identifier as assigned by Amazon when the old Fire was originally registered, and when you registered the new device it was assigned a new unique identifier. This means you cannot simply copy the entire Android folder over from your backup, you must copy the subfolders / files individually from within the Android directory of your backup.
If there have been significant operating system changes between the old Fire and the new one, some of the backed up content may not function properly on the new device. Therefore, if you’re transferring from an old Fire to a new one and the new one is a different model than the old one, it’s safest NOT to copy the following system folders or files to the new device:
Android > Data > Amazon
Android > Data > com.amazon.kindle
Android > Data > com.amazon.kindle.UnifiedSearch
Android > Data > com.amazon.photos
Android > Data > com. amazon.venezia
Also note, in the Android > Data > com.amazon.venezia > files folder, there’s a subfolder called “apks” and several individual files. These “apk” files are save and data files from apps. Copy the backup files from within the “apks” folder to the new device following the above directions, but don’t copy anything else from the Android > Data > com.amazon.venezia folder.
When you’re warned or prompted about overwriting files, click ‘Yes’, ‘OK’, or whatever is the correct response on your computer to approve overwriting content in the new Fire window, unless the file you’re being warned about is a ‘token’ file.
‘Token’ files, which are system and Amazon registration files, will have the word “token” mentioned somewhere in the pop-up warning text or the file name itself, so be on the lookout for these as you go through this process and be sure to select “No” in the “Overwrite Y/N?” pop-up dialog. When I went through the process there were only two. If you make a mistake and happen to overwrite them, don’t worry. The worst that will happen is that you’ll be prompted to re-register your new Fire the next time you want to use it, and re-registering to the same Amazon user account as before does not affect content already stored on the Fire in any way.
10. When you’re done copying the backup files and data, again detach the new Fire from your computer just as you did in Step 5 above.
11. Turn on the Fire and check to verify your files and content are there. Do this by opening a book you were reading / movie you were watching / MP3 you were listening to, to see if it opens where you left off. Check your progress in game apps you’ve been playing. If nothing copied over, you may have made a mistake somewhere along the line and may want to try repeating the process. If there are just a few items that appear to have lost bookmarks or app progress, it’s probably not worth the bother.
12. Delete the KFBackup (or whatever you called it) folder from your computer. If you ever have to do a factory reset or migrate to another new Fire in the future, you’ll want to start with a new backup folder.
If the device doesn’t appear to be functioning properly after following this process, either something went wrong during your copy from backup step, or the device you’re copying files to is too different from the old one to use the backed up files. In that case, unfortunately, you can only repeat the factory reset and start over from scratch: re-download the content you want from the Cloud (NOT your backup), and make peace with the fact that you’ve lost some app / game progress.
In the case of games, the developer’s website may have special directions for how to transfer save files from an old device to a new one. This is true of the My Singing Monsters app, for example. If you want to try every possible way to restore your app/game progress, try Googling the name of the app to locate the app website or developer’s website. If you find a site, go the Help or Technical Support area and search on “transfer [app/game name]” to find any instructions the developer may have.
Remember: there’s no guarantee that everything will survive being copied over so don’t be surprised if a few things were lost, but this method gives you the best chance to preserve the maximum amount of files and content.
If you are confused about any part of this process or still have questions, please use the comment form below to ask for clarification. Be sure to list the specific make of both your old and new Fires (e.g., First Generation-2012, Second Generation-2013, Third Generation-2014) as well as the specific type (e.g., HD, HDX, or just Kindle Fire).
* * *
And now…
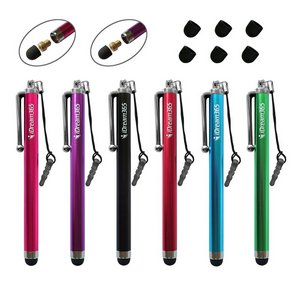
If you’ve got a touchscreen device, you’ve GOT to have a stylus. It gives you finer control on the screen and prevents those annoying smudges and fingerprints. It’s always a good idea to keep a few extra on hand too, and the iDream365 Pack of 6 Capacitive Stylus/Styli With 6 Replacement Tips is just the ticket. It comes with six styli in various colors, each with its own “leash” (cord with a plug that keeps the stylus anchored to your device when you insert the plug into your headphone jack—don’t worry, it won’t harm the jack) and each with its own replacement rubber tip. This set has an average review rating of 4.5/5 stars, it’s eligible for Prime shipping and currently (as of 12/25/14), is priced at just $9.99—66% off the regular price!